Infrastructure as Code Using AWS Cloud Development Kit
AWS Cloud Development Kit (AWS CDK) is an open source software development framework that can be used to define and provision cloud resources using programming languages such as Python. AWS CDK resources are provisioned using CloudFormation, CDK TF can define Hashicorp Terraform HCL state files written in TypeScript and Python, and CDK8S provisions Kubernetes Resources written in TypeScript, Python, and Java.
AWS CDK enables anyone familiar with Java, Javascript, Python, TypeScript, and C# to create resources in a repeatable manner without having to learn domain-specific languages. Essentially, AWS CDK is the purest form of Infrastructure as Code, because you’re actually writing code to provision resources.
I’ve worked in some environments that wanted to avoid using specialized tools such as Terraform due to the additional learning curve. In those environments, I would rather create python constructs using AWS CDK than using CloudFormation directly since that would also require learning how to create the templates.
One of the things I like most about CDK is that I can use it for most of the things I love and am familiar with - AWS, Terraform, and Kubernetes. One thing to note is that both the cdktf and cdk8s are in alpha as of December 2020, so proceed with caution and don’t use them in Production environments until the full release. It doesn’t hurt that Terraform CDK also supports Google Cloud and Azure resources and modules, so I can still work in a multi-cloud environment and use CDK.
I have shared a simple AWS CDK and CDKTF example on my blog that can be used to create a CloudWatch Alarm and SNS Notification written in Python.
PreRequisites:
To begin using AWS CDK - you must have installed AWS CLI, at least Python3.6, and Node.js. The AWS CDK Toolkit can be installed using the Node Package Manager (npm).
npm install -g aws-cdk
cdk --version
The Python package installer, pip, and virtual environment manager, virtualenv, are also required.
Install pip and virtualenv
python -m ensurepip --upgrade
python -m pip install --upgrade pip
python -m pip install --upgrade virtualenv
Create a project:
To create a CDK Project, you have to create a directory and initialize it - the process is similar to creating your first Terraform project. Initializing the project will create various elements of the project, including classes, subfolders, and files.
mkdir automation_rocks
cd automation_rocks
cdk init app --language python
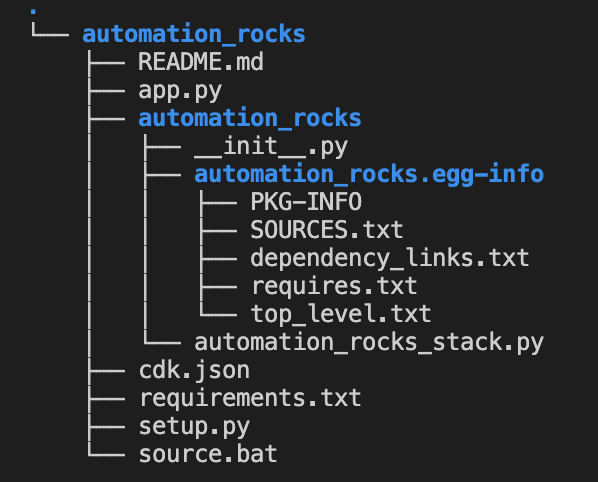
Your directory structure should look like this:
Activate the virtual environment for the project
source .venv/bin/activate
Update the requirements.txt file to include the dependencies for your app and then install them.
For instance, since we’re creating CloudWatch Alarms and SNS notifications, you would add the following to the setup.py file in the install_requires section:
    "aws-cdk.aws_cloudwatch",
    "aws-cdk.aws_ec2",
    "aws-cdk.aws_sns",
    "aws-cdk.aws_events",
    "aws-cdk.aws_sns_subscriptions",
    "aws-cdk.aws_cloudwatch_actions",
After updating the setup.py file, install the requirements
python -m pip install -r requirements.txt
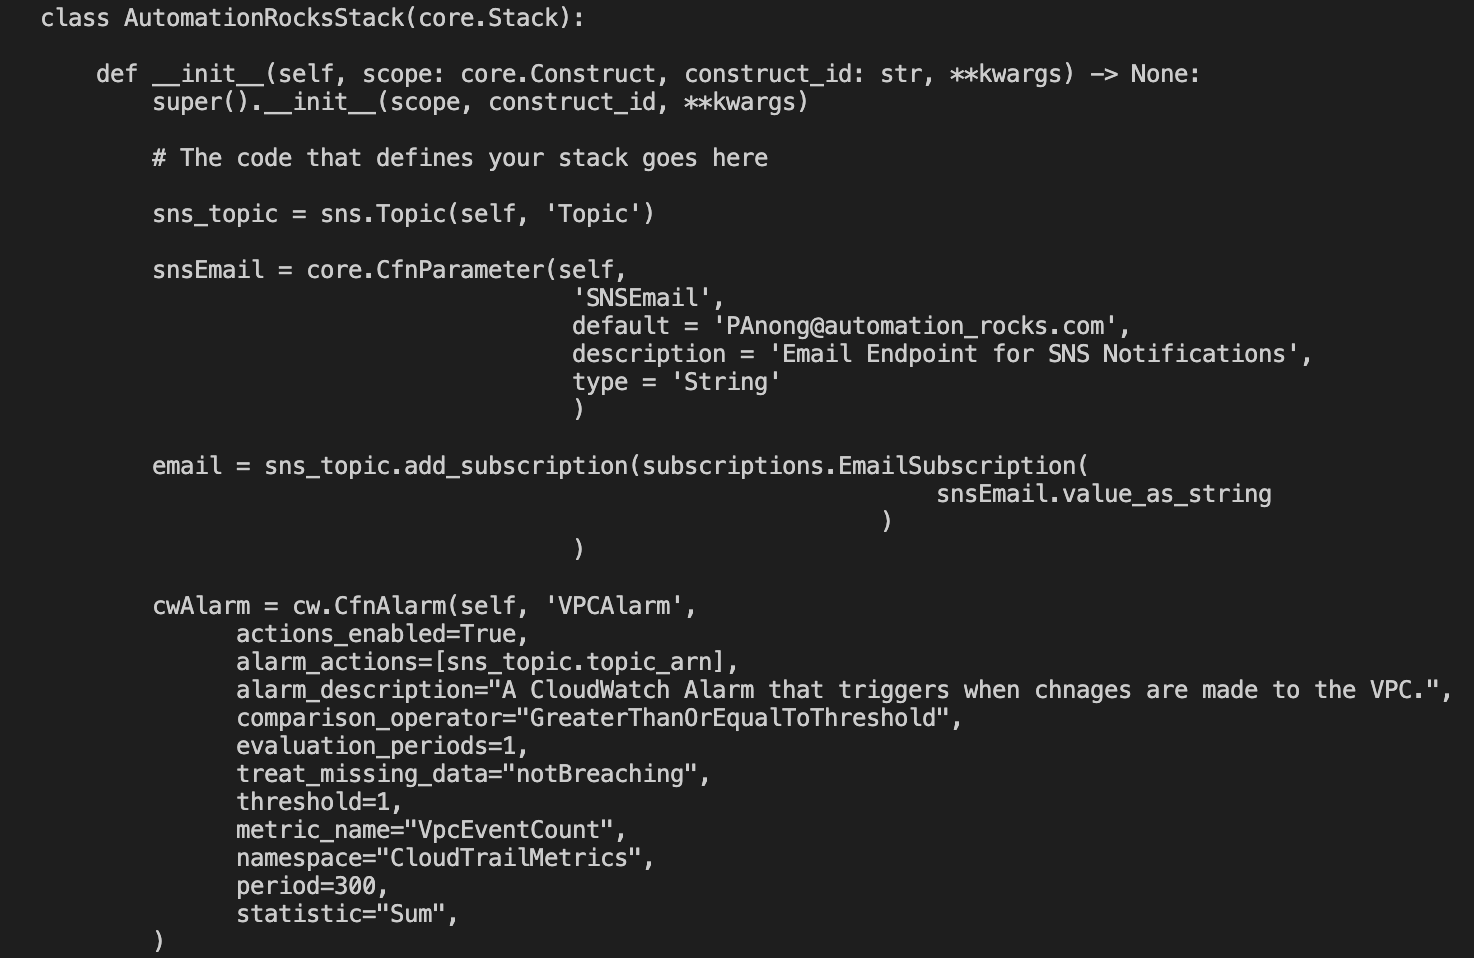
Once your requirements are installed, you can create your constructs. The code that defines your resources will be in the <project_name>/<project_name_stacks.py>
Update your app.py file to provision your resources in the environments you specify
Use the cdk bootstrap command to bootstrap your AWS environments. I bootstrapped two environments in my example. Both environments were in the same account, but in different regions. You can bootstrap cdk for cross-account deployments by specifying the account number and region and ensuring the AWS credentials have the necessary permissions.
If you would like to preview the CloudFormation Template that will be generated, you can run the cdk synth command. Running cdk synth saves a copy of the template to cdk.out/<project_name.template.json>.
If you specify multiple environments, you would need to synthesize each stack separately, e.g.
cdk synth <stack_name>
cdk synth automation-rocks-nova
To deploy the stacks, use the cdk deploy command
cdk deploy <stack_name>
Using terraform cdk:
Again, this is currently in alpha, so avoid using it in a production environment for now.
PREREQUISITES:
Python3.7 or later
pipenv
Terraform CLI
AWS CLI
INSTALL TERRAFORM CDK
Install using npm:
npm install -g cdktf-cliCREATE A PROJECT
mkdir tf-rocks
cd tf-rocks
There are two Python templates available, the python template uses Pipenv for package management while the python-pip template uses pip and a requirements.txt file.
If using pipenv, you initialize your project using this command:
cdktf init --template="python" --local --project-name tf-rocks --project-description "Patricia Anong Blog CDK TF Example"
If using python-pip, you initialize your project using this command:
cdktf init --template="python-pip" --local --project-name tf-rocks --project-description "Patricia Anong Blog CDK TF Example"
Note: By supplying --local option, your Terraform state file will be stored locally in a file terraform.tfstate in the root of your project. If you omit the --local flag, you will be prompted to store your state in Terraform Cloud. By default, cdktf allows you to manage the state of your stacks using Terraform Cloud for free.
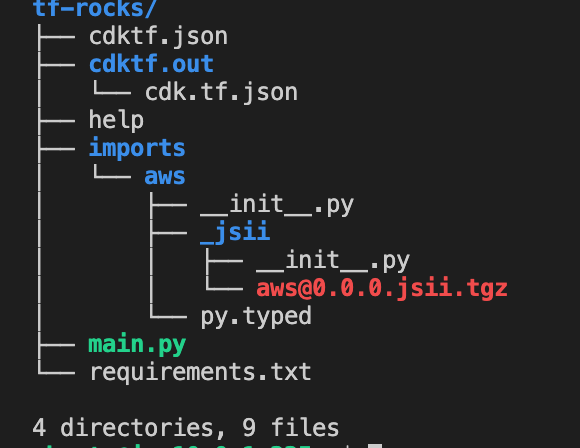
Similarly to AWS CDK, initializing a cdktf project will create some files and folders. The structure will look like this:
Update the cdktf.json file to include any providers and modules you need and run the get command to generate CDK constructs for Terraform into the imports directory
cdktf get
You can configure a remote backend in the cdktf.out directory in a file called remote.tf.json
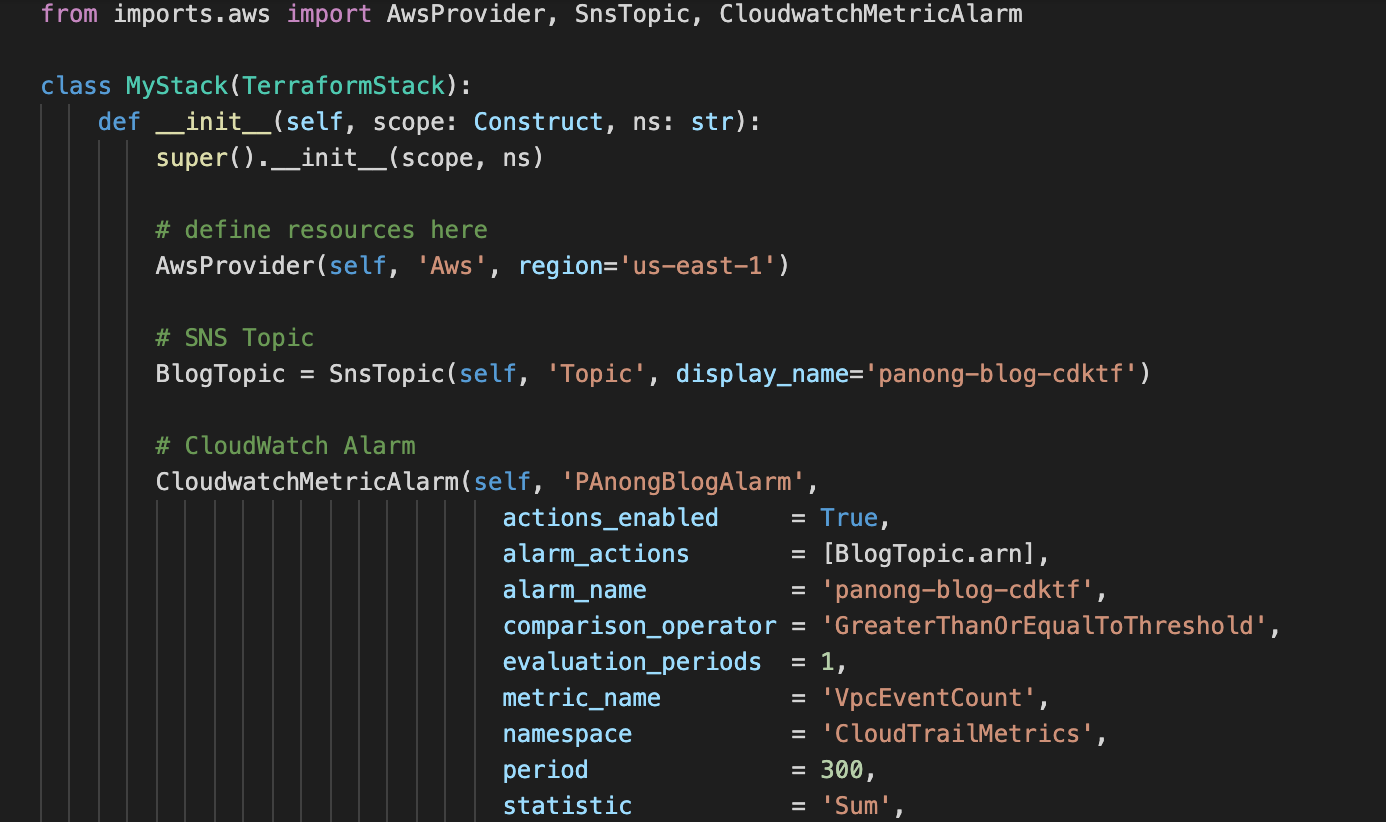
You define your resources in the main.py file:
Then, you can use the cdktf synth command to generate the Terraform resource configuration in the cdktf.out/cdk.tf.json file
To provision the resources, you can use the cdktf deploy command.
For the full version of the included code snippets, visit my GitHub Repository.
*Cover Images from levelup.gitconnected.com


