Create a MySQL Cluster Database Instance in RDS
Amazon Web Services (AWS) offers various options for hosting databases in the cloud. The options range from a fairly simple and fully managed database instance in Relational Database Service (RDS) and Amazon Aurora, to a more involved setup process using Elastic Compute Cloud (EC2). Amazon Aurora is a fully managed MySQL database engine, the PostgreSQL compatible version of Amazon Aurora is fairly new and currently in the preview phase.
The main difference between creating an instance in RDS/Aurora versus in EC2 is that RDS and Aurora are fully managed services. That means that tasks such as upgrades, backups, and snapshots are handled automatically without any user intervention (DBA). With that level of automation, RDS does not allow access to a host server, connections to the database instances will be via tools, Identity and Access Management, and local tools such as MySQL workbench and PgAdmin. All you have to do is choose your options during instance creation, and your database will be available after a few minutes. One of the main limitations of RDS is that legacy versions of database systems and OS versions are not allowed.
Whereas, EC2 is similar to what most DBAs and System Administrators are used to - using a SSH client to connect to a host server, downloading and installing software, and being able to control every facet of database and host maintenance and administration. With EC2, you could easily use an older version of your database software, but the biggest drawback is it requires a more involved approach to create the database and storage. However, with EC2 and AWS resources in general, there is an ease of scalability, high availability, fault tolerance, and elasticity that is unmatched with any on-premise data center.
This blog post will walk you through creating a MySQL Database Instance with Multi-AZ Availability in Amazon Aurora. It will also touch on some of the other resources that interact with the RDS Database in the main areas, networking, security, storage, and high availability.
The high level architecture of the AWS Resources is as follows:
In order to ensure a highly available, fault tolerant, scalable, and elastic arhitecture in AWS, I will walk you through provisioning a MySQL Clustered database that acts as the back-end for Apache Web applications.
I have attached a visual representation of the AWS resources that would be interacting with the MySQL cluster.
Prior to creating the MySQL Cluster, I created a Virtual Private Cloud (VPC) that spans multiple availability zones in order for applications to have high durability and availability. The VPC in each availability zone has multiple subnets - a private - accessible only by other subnets within the VPC and public - open to the internet. The private subnet is where the database instance will be created and it acts as a sort of firewall isolating our database from direct access to/from the internet.
Afterwards, I launched two Apache public Web Servers and a basic application on EC2 Instances - the EC2 instances are accessible via the internet, so it will I created them in the public subnets. Then I configured a security group to specify the inbound and outbound access rules for the EC2 instances and then created and assigned an Elastic Public IP address from the NAT server to enable access to the EC2 Web Servers from the internet. Then, I configured an Elastic Load Balancer (ELB) to distribute traffic evenly across the EC2 instances and added them to an autoscaling group based on thresholds set using CloudWatch to ensure that the instances can handle the load for the application. The ELB's public IP is associated with the web address, that way, it can be utilized for distributing the traffic and ensuring the health of the EC2 instances.
Once, the EC2 instances were created, I launched a Bastion Host in the public subnets in each availability zone. A bastion host is a server instance with the sole purpose of acting as the proxy and primary access point from the Internet to your other EC2 instances, it is meant to be fully exposed to the internet, unprotected by a firewall which makes it vulnerable to attacks. In AWS, it will create yet another layer of security for your instances and help protect your database instance since all access to your database is via the private subnet.
Register your domain or manage your existing DNS for your web servers using Route 53.
Other AWS resources, I provisioned were an S3 Bucket for bulk data storage that is highly accessible. I set up an object lifecycle policy that would change the storage class of the data stored in the S3 bucket based on the frequency with which the data needs to be accessed. I also configured monitoring of the EC2 instances using CloudWatch to do things such as auto scale based on CPU Utilization and send me notifications using SNS by creating a few topics and setting up subscriptions to those topics.
The next step in completing the requirements for this environment would be to create the MySQL database with Multi-AZ Availability on the back-end within the private subnet. This means that there is no internet gateway associated with the routing table for the two private subnets, so access to any resources within those subnets will be from other resources security groups within the VPC. I also show how to connect to the MySQL instance using MySQL Workbench via the Bastion Host Server.
Here is a drawing of the AWS Architecture

Create a Key Pair
Before we begin, create a key pair that will be used for access to the database server:
From the AWS Console, select Services > EC2 > Key Pairs > Create Key Pair
Name the key > Click Create and a window will pop up for you download and save the key locally to your computer

Create a Virtual Private Cloud
From the AWS console, click on Services > VPC > Start VPC Wizard > VPC with Public and Private Subnets (Option 2)
Enter the VPC Name > Select an availability zone for the public subnet > Be sure to pick the same availability zone for the private subnet
Click on Use NAT Instance Instead > Choose the Key pair you created earlier
Click on Create VPC

Create Public and Private Subnet for the second availability zone:
Public Subnet
After clicking on create above and the VPC is created, you will be in the VPC Dashboard homepage.
Filter by VPC and select the VPC you just created, then click on Subnets > Create Subnet
Enter the following values:
Name Tag: Public Subnet 2
Select the VPC created in the last section
Select an availability zone different from the one you selected for the last Public Subnet created in the last section.
For the CIDR Block enter: 10.0.10.0/24
Click Yes Create

After creating, select the Public Subnet 2
In the Route Table section, click Edit
Change To: select the only other option in the drop down
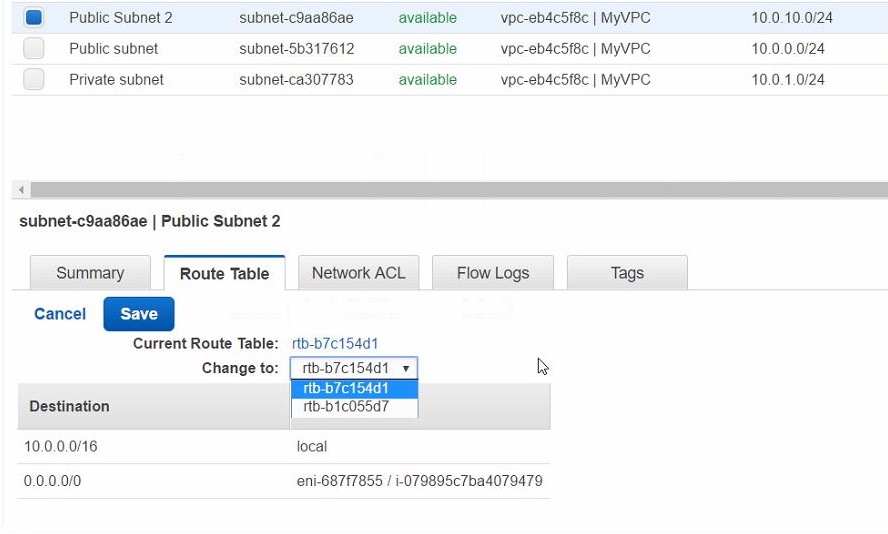
You should see the Target for All Traffic Destination (0.0.0.0/10) change to target starting with igw (Internet Gateway for the VPC we created earlier)

Click Save and continue to create the second Private Subnet.
Private Subnet
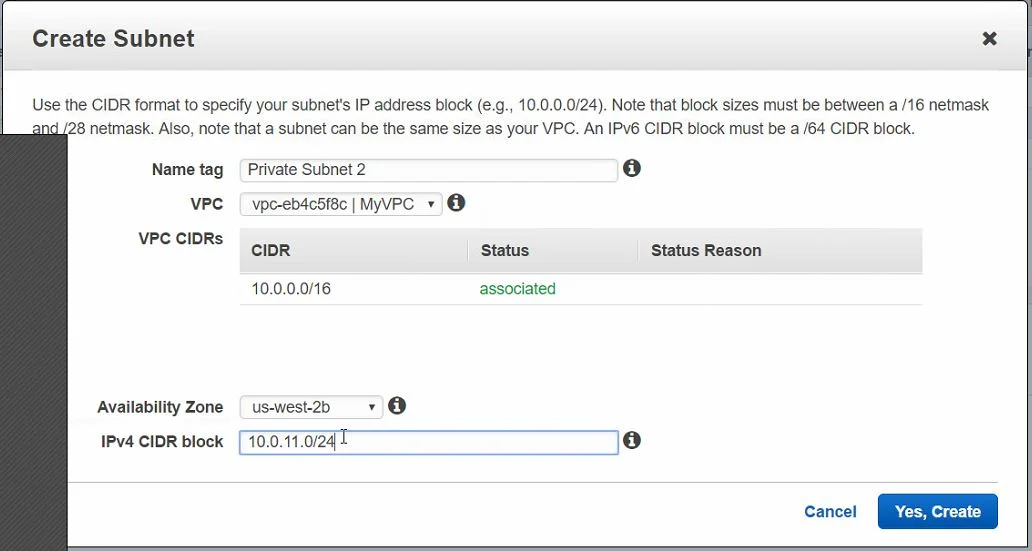
Create Subnet
Enter the following values:
Name Tag: Private Subnet 2
Select the VPC created in the last section
Select the same availability zone different you just selected for Public Subnet 2 above.
For the CIDR Block enter: 10.0.11.0/24
Click Yes Create
Create Subnet group for the RDS Database Instance
From the AWS Console > RDS > VPC > Subnet Groups > Create DB Subnet Group
Name the subnet group
Optional: Add a description
VPC ID : Select the VPC created earlier - MyVPC
Availability Zone: Enter the availability one for Private Subnet 1
Subnet ID: Add Private Subnet 1
Click Create
*Repeat the last three steps for Private Subnet 2
Launch a Web Server in each Availability Zone
From the AWS Console, select Services > EC2 > Launch Instance
Select the AMI and configure the instance - make sure it is attached to the public subnet and create a security group for the Web Server Instance.
Repeat the process above for the second Web Server in another Availability Zone (Public Subnet 2) with appropriate changes in the Tags section and be sure to create a new security group for that web server as well.
Configure the Elastic Load Balancer(ELB), I chose an internet-facing Application Load Balancer (ALB) and I also added a listener for HTTPS in the public subnets of my VPC - HTTP is added by default- to mirror the rules added to the security group of the EC2 instances.
Then I created a launch configuration and an auto-scaling group which allowed me to add the EC2 instances to that auto-scaling group and specify the policies that determine when, where, and how auto-scaling should occur.
Once all that is done and I configured the other resources, - Bastion host, S3 buckets, SNS topics and subscriptions, CloudWatch alarms, and user access rules using IAM. The only thing left to provision is the back-end MySQL database in Amazon Aurora.
Create MySQL Database
Now that the network & firewall, security, storage, monitoring, and application components are created, you can create your Amazon Aurora Instances.
From the AWS Console > Services > RDS > Launch DB Instances
Select Amazon Aurora (First option)
DB Engine(Version of Database) is automatically chosen
Select the DB Instance Class (Size) you need.
Multi-AZ Deployment: Accept the default setting of Create Replica in Different Zone (Amazon Aurora’s replication is bundled into the price, so you only pay for the storage your database uses).
DB Instance Identifier: This is a name that identifies all DB instances owned by your AWS account in the current region
Master Username: Essentially the root account for your account. This is the user you log in with to create other database users.
Select a strong password for the user.
Click Next Step

In the Network and Security Section, make the following selections:
VPC : The VPC created earlier - MyVPC
Subnet Group: Select the only option available, Create new DB Subnet group
Publicly Accessible: No (We want access via the bastion host we will create)
Availability Zone: Select the availability zone you the Primary(Writer) instance to be located e.g. us-west-2a
Security Group(s): Create new Security Group for the DB Instances
In the Database Options Section, make the following selections:
(Optional) DB Cluster Identifier: Choose an identifier for the database cluster, I prefer to do this for easy identification
Database Name: Name of the MySQL database that will be created
Accept the other default options, or make changes based on your requirements
In the Failover Section, choose the priority tier for the Database Instance, the lower the tier number, the higher the priority e.g. Tier 0 > Tier 1 > Tier 2. So, in case of a failover, Amazon will promote a Tier 0 instance to primary before Tier 1.
In the Backup Section,
Choose the retention period of the automatic backups taken by Amazon RDS. 1-day backup retention is free in Aurora, the choice you make will be based on any SLAs you have within your business.
In the monitoring section, make any changes you wish or accept the defaults
In the maintenance section, specify the maintenance window for Amazon to make modifications to the instance such as upgrades, name changes, etc.
Click Launch DB Instance > Click View Instances
You should see two instances being created:

Initially, both instances will be identified as readers. Note that the second instance has a name with an availability zone appended to it - this will eventually be the reader instance, once the creation process completes.
Once the status changes to available, click on the writer instance to show the details

On the left click on the button with a magnifying glass
This page shows you all the details of the instance, including the endpoint(think of this as the host name) and security groups, etc.
Copy the Endpoint and save to a notepad without the Port at the end (e.g. :3306)

Modify the DB Subnet Group created to have the database in the Private Subnet only:
From the AWS console > Services > RDS > Subnet Groups
Select the Subnet Group with the VPC you created earlier > Edit
Modify the Description to make it easily identifiable.
In the Availability Zone table, remove the two CIDR Blocks that identify the public Subnets in the the two availability zones.
There should only be two Availability zone CIDR Blocks when you're done - and they should be the private IPs.
Click Save.

Launch a Bastion Host
From the AWS console, select Services > EC2 > Launch Instance
Select Amazon Linux AMI (First option)
Select an instance size > Next: Configure Instance Details
Network : Select the VPC that was created - MyVPC
Subnet: Choose one of the Public Subnets
Auto-assign Public IP: Enable
Click Next: Add Storage > Accept the defaults or modify based on your requirements
Click Next: Add Tags
Create a tag that specifies that this is the Bastion Host
Click Next: Configure Security Group
Create a new security group and name it for the Bastion Host
Modify the Default SSH Rule to limit access to a range of IPs e.g. Your personal laptop or the Public range of IPs from your business's network.
Click Review and Launch
Verify the details > Click Launch
Select the Key pair created in the beginning of this post and acknowledge your access to the key pair (.PEM ) file.
Click Launch Instances > Click View Instances
Once the instance is in 2/2 checks status state, select it
Copy the instance id to a notepad.
Click on Security Groups in the left pane > Find the Bastion Security Group and copy the Group ID to a notepad as well.
Allocate an Elastic IP to the Bastion Host
In the left pane, select Elastic IPs > Allocate new Address > Allocate > Close
Select the newly allocated IP > Actions > Associate Address > Select the Instance ID that matches the Bastion Host
Accept the other defaults or make changes according to your requirements > Associate

Repeat the steps above to create a Bastion Host in the second availability zone.
Restrict Access to the Database Server
In the Security Groups section, find the Security Group for the Aurora Database Instance (it should be called rds-launch-wizard)
In the Inbound section, modify the current rule, Aurora/MySQL
Remove the Source IP listed and replace it with the security group for the bastion host in the Source section.
Add a Rule for SSH with the source as the security group for the bastion host.
This will restrict access to the database instance to connections initiated via the bastion host.

Repeat the steps above for the second Bastion Host and Aurora DB Instance
Connect to the MySQL Database using MySQL Workbench
From the AWS Console > EC2 > Instances > Select one of the Bastion Host Instances
In the Description section, copy the IPv4 Public IP Address to a notepad.
Launch MySQL Workbench
Select Add a new connection and make the following selections:
Connection Name: Whatever you want to use as the name for the connection e.g AuroraMySQL
Connection Method: From the drop down, select Standard TCP/IP over SSH
SSH Hostname: Bastion Host Public IP:PORT e.g. 52.89.23.195:22
SSH Username: Use the default for now, but it would be best to create a username for individual users with appropriate permissions. Default is ec2-user
SSH Key File : Attach the Key Pair .PEM file created and downloaded in the beginning of this blog post.
MySQL Hostname: The Aurora DB Instance Endpoint you copied earlier
MySQL Server Port: 3306 if you kept the default or whatever port you chose during Instance creation.
Username: Use the Master User for the initial connection and create other users and roles with appropriate permissions as needed.

Test the connection and there should be a pop up asking you if you would like to proceed since the SSH Server Fingerprint is missing - this is a common occurrence with MySQL workbench, read more here.
Click Continue

Another window will pop up prompting for the password of the Master user, you can choose to save the password for future connections if you wish.

Test the connection again to confirm you entered the correct password and you should get a pop up with MySQL connection details

Click OK > Click OK again to save the connection details.
Your new connection should show up, once you click on it, you should be connected to the DB Instance and see your database e.g. AADB

There you have it! You have created a MySQL DB Instance in Aurora, that is secure, highly scalable, highly available, and fully managed!
For ease of deployment in the future, I created a CloudFormation template from the resources created above and saved it to S3. If I ever need to deploy a similar configuration, I can use that template to create a stack rather than individually creating and deploying the resources and their dependencies:
Some of the next steps would be configuring database user access, setting up any additional IAM profiles, configuring additional CloudWatch Metrics and alarms or creating dashboards for monitoring resources, and so much more can be achieved in AWS.
I hope this gives you some insight to a few of the things you can achieve using AWS from end to end in your environment. Feel free to contact me with any questions or comments, see you next week when I detail how to migrate an on-premise Oracle database to MySQL in RDS!
*Cover Images from aws.amazon.com